Hola! The heat index hit 102 degrees F today here in my hometown. The "lows" this evening will drop down to the high 70's, so the AC will stay on this evening and the windows will remain closed, sigh. Relief is promised for Tuesday when a cold front from the north is supposed to start pushing through dropping the temperatures into the more normal for this time of year 70's with much lower dew points. Again today the dew point is over 70 and it feels like a combination of an incinerator oven and too much steam in the steam bath outside for me to be comfortable.
I was out again, however, between 7:00 a.m. and 7:45 a.m. cleaning out and adding fresh water to the concrete bird bath (acts as the equivalent of Grand Central Station in NYC), watering a few shrubs and plants that did not get the benefits of the thunderstorm we had Friday night/Saturday early morning, and sweeping up nut shells from my tribe of squirrels - the mess never ends even if the weather keeps them away in their nests for most of the day. A few of my squirrel tribe who have nests around my house do come down to the yard and lay in the shade in the grass, with their hind legs stretched out behind them, just like dogs do. So cute!
I thought you might like to know what it's costs me thus far to embark on this round of adding curb appeal projects to my front yard. As I've mentioned before, I'm retired and on a fixed budget, so I keep a close eye on those "miscellaneous expenditures! So far, this is what I've spent to add some pizzazz to my front yard. Cost includes shipping plus sales tax, if charged:
New red mailbox: $47.99
New black porch light: $60.58
Apple Red Rustoleum Paint for front door: $8.65 (32 oz., which will be more than enough to provide me with two coats of paint for the door)
Black shutters for picture window (15" x 70"): $68.89
Two artificial 3-ball topiaries: $49.93
Total: $236.04
This does not include the cost of installation of the new porch light, or the mailbox and shutters, which requires a masonry bit on a power screw driver/drill and a good ladder tall enough to reach the top of the picture window framing. I am going to ask a neighbor who owes me a favor if he has the tools and know-how to do this and if he would be willing to help me out. If not, I will have to hire a handyman to do these 3 installs for me.
Stay tuned. I am dreaming of lush front yard garden beds extended out from the house to cut down on the amount of lawn I need to care for/cut, and have been day-dreaming over endless Pinterest photos of gorgeous front yards that would be ridiculously labor intensive to keep looking that good. My reality is that my well-tended stretch of lush green grass actually needs to be cut RIGHT NOW both out front and in the back yard, but I'm not going to attempt it with the heat index over 100 degrees F and dew points in the tropical zone, I'd keel over in 10 minutes tops! If I'm going to have to cut the grass every 5 days during this time of year, I want to minimize the area that needs cutting for sure! That means expanding the flower beds. That is something I think I may be able to afford to hire a landscaper to do for me (remove sod and add edging, I'll do the planting and primping).
However, tomorrow I am going to be calling around to firms that specialize in poly-foam injections to raise concrete slabs and sidewalks, etc. to arrange for free estimates. I want to find out exactly how much it would cost me to have my front sidewalk raised where it needs to be so I don't have a giant size step to the first step on my front porch. From what I've read, it supposed to be more stable over time than the traditional mudjacking technique using concrete and soil injection to raise a slab, etc. I've been sitting on that project since I moved into this home nearly 4 years ago, and it's time to get it fixed. No more procrastinating, Jan!
Updated June 18, 2018: Oops - I made a mistake. The two topiaries' cost (including shipping) is $116.29, not $49.93 as I previously reported above. Thus, the total expenditures for my planned front yard pick-me-ups is $302.40, not $236.04 as previously stated. Me bad, mea culpa!

Maison Newton: Heart, Hearth, Home...
Sunday, June 17, 2018
Saturday, June 16, 2018
Inspiration for My Home During a Heat Wave
 |
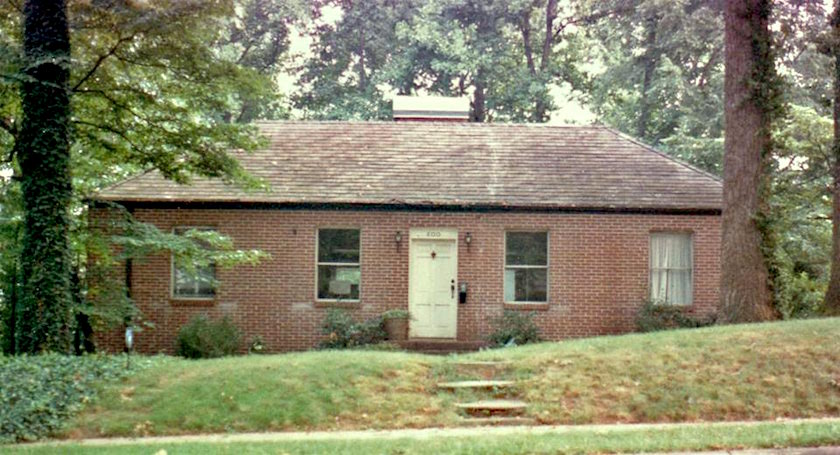
| Maison Newton (retirement version) at present. Sad empty porch planters flanking the door. Bare areas in planting beds where colorful annuals would normally be planted by now, but transplanted perennials from around the yard will fill in beautifully once put in. Barberry shrubs need to be pruned. You really can't see the porch light and the only pop of color on the facade right now is the red mail box! The flower beds are not as nice looking and spiffy clean as I would like, but the weather hasn't been cooperative this season. Notice the large spread of white trim around the picture window, which juts out at a 45 degree angle from the inner trim! The black metal trellis I moved from the driveway (house side) garden to between the two ranch windows on the left (the bedroom and bath wing) isn't really showing up as much as I'd like. I maybe need something heftier there. But it's better with it there now than it was empty. |
Hola! Heat indexes for the next few days will be 100 and above, with dew points in the 70s. Right now, at least, we are catching a bit of a break, with a wind out of the SE off of Lake Michigan and the sky has been skimmed with clouds off and on since sunrise. So the temperature feels "okay," but the air is uncomfortable sticky. I start experiencing difficulties breathing once the dew point gets above 50 with even average exertion (bad ticker). So, for now I am pretty much house bound, except very early in the mornings when there is a semblance of cool air outdoors.
 |
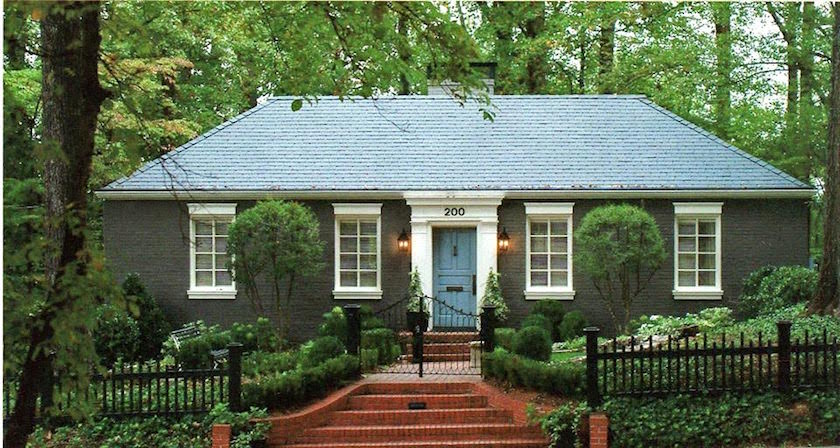
| An inspiration photo from Pinterest. The link for this photo is not to the home, but to a page offering a web domain for sale! So, I've no idea where this came from, and cannot properly link its source other than this Pinterest search. The siding looks similar to the color of my siding, and my window trim is also white, although my windows are narrow 1950s ranch style (long and narrow) and not Cape Cod cute. I hope my house looks this good with a soon to be painted bright red front door and new black shutters to be hung on my giant picture window framed in acres of white vinyl trim. |
Sunrise was so beautiful, with the early sunlight bouncing orange and pink off lingering strands of stormy grey clouds. We had some pretty strong winds and thunderstorms for several hours overnight, with lots of lightning. The thunder was of the CRACKLING kind that shakes your whole house and ends with a sort of sonic boom effect! Pretty scary stuff, I was wide awake as soon as I heard the winds rise out of nowhere and start sweeping up against the house. We got a lot of rain, and the storm was intense. But we did need the rain, I had been contemplating running up a water bill by giving the garden beds and lawns a good soak. I'm thankful that I didn't loose any big branches off of my arborvitaes, nothing landed on my house from neighboring trees, everything looks pretty much clean in the neighborhood except for lots of leaves all over the place.
I was outside by 6:30 a.m. to take advantage of the relative coolness of the early morning. My intent was to move the volunteer columbine from the front garden bed underneath the bedroom windows and transplant it in the driveway garden where I have lots of other volunteer columbines that sprouted from seeds the one columbine plant I bought in 2016 has strewn about the area over the past two springs! All varying shades of purple, none matching the "mother" plant, LOL. Anyway, after digging deeper into the miniature spirea shrub that the columbine was growing from seemingly its center, I realized there was no way to get at it easily unless I removed a large root ball of both shrub and flower and try to untangle them. I decided against trying that, a lot of work with no guarantee of success. So, I swallowed hard, because I hate pulling anything out of my garden except weeds, but pull it out I did, as best I could. The little spirea bush was being smothered by the giant foliage ball of the columbine, covering half of it. I hope that now with the columbine gone and with exposure to lots of sunshine, the branches will quickly green up and the little shrub will be okay.
 |
| Hard to see, but the back half of the shrub is nothing but bare sticks. I will have a pruning job to do on this and the other shrubs in the front beds, still more winter clean-up to do and weed pulling. This spring was not cooperative! |
No roots came out with the columbine parts, so there was nothing to try and tarnsplant; they branches and stems were bagged and put into the trash. I won't be surprised, though, to see another one spring up somewhere in the garden out front next spring!
Now I want to talk about the color inspiration for my house, if inspiration it can be called. Just as various shades of gray are all the thing these days in both exterior and interior colors, back in the 1990s the IT color in siding and interior paint in my hometown was a sort of dark "greige" or dark taupe. My simple 1956 Milwaukee basic ranch has 1,074 square feet with 3 small bedrooms and one small bath with a full basement. The kitchen is about 10 x10 and there is an eat-in area also about 10 x 10. The original picture window in my kitchen eat in area was replaced with a slider to stairs leading down to a large concrete patio in the backyard. I looked at two other homes in this same double long block, one right next store, that have the identical floor plan to this "downsize retirement home" I ended up buying. It seems every few houses in this subdivision have the same floor plan, including the kitchen dining area picture window still in place. Thousands of this style home were built in new suburban areas all across the city, along with small "Cape Cod" style homes, at the end of WWII as the suburbs expanded and new families with children wanted to move into homes with larger lots, a garage, and more space between them than what homes have in the central part of the city, where I grew up and was used to living on top of my neighbors (and by default knowing all of their business because you could hear everything going on in their houses, that's how close they are).
 |
| Source, Pinterest, from Centsational Girl blog. This siding looks to be the same color as mine. Oh, if only I could afford to have a peaked portico cover added above my front door! Be still my heart, thump thump thump. |
Everything is in good shape and I'm not planning on spending thousands to replace anything on the exterior of the home, although the sunken part of the front walkway bugs me and I'm going to have to do something about that sooner rather than later. I'm fine with the colors of the trim, roof and siding, but I want to punch up the curb appeal. I've been wanting a red door for some time, and when I saw my house back in 2014, I knew red would look good with the home's current color scheme. Black shutters also seem like a no brainer idea to me, as demonstrated by the photographs I've posted here for inspiration! If my plain basic ranch house can look half as cute as any of these homes I'll be pleased as punch!
 |
| Source: Pinterest search. If I had an extended front porch area like this I could probably add columns to my facade because my overhang is at least 2 feet deep. Hmmm... |
 |
| Source: Pinterest search. I hope my triple ball topiaries in white planter boxes look just as pretty by my soon to be red front door! |
Friday, June 15, 2018
A To Do List to Add Curb Appeal to the Front Yard
If I had tons of money I have visions of adding a peaked roof portico to shelter guests from the rain on the front porch and expanding my pedestrian front concrete stoop into a magnificent mid-century modern deck with multiple steps down and built-in planters, with a flagstone walkway to the public sidewalk.
I would expand the garden beds, remove the tree that was planted too close to the bedroom corner of the house and have an appropriately sized tree (when mature) installed further away, and add tons of beautiful plantings. Or I might decide to go full-blown English cottage garden, complete with white picket fence and rose bushes everywhere, and a pillared front porch with a porch swing. I'd hire a professional landscape architect to do a fabulous design for me who would hire contractors to do all the work. I'd never have to lift a finger except to sniff and point if something doesn't please me. Or I'd buy a Cajun (French) style cottage and fix it up to look exactly like this one:
To fully appreciate the scope of the work that was done, here is the "Before" photo from the same source:
Ahhhh, I wish I had some of those trees. I'd also have a full-time gardener to take care of it all, LOL! To sleep perchance to dream...
Back to reality, THUD. On a limited retirement budget, dreaming of various gorgeous front (and back) yards is fun but can also be a bit depressing. That can paralyze you from doing anything because a few small changes here and there don't see like they'll make that much difference. And even those few extra things will stretch the budget and make you think twice about splurges that you really should not do because what if my Medicare increases by 50% or even disappears in 2020 if Speaker of the House Paul Ryan gets his way? I wouldn't be able to do a time reversal and unspend the money. One must be practical.
It's hard to believe, but next month will be four years from my 2014 move in date on July 7. Wow, time really is flying. I'm going to be 67 in a few months. I still have painting to do on the inside (yes, I know, me bad. Me very very bad.) And it makes me mad that I have to worry about spending maybe $500 in total to do some things to prettify my front yard which already looks respectable as it is. I want to be able to enjoy my house and be satisfied with how it looks on the outside and the inside in my old age. Is that too much to ask after working my butt off for 46 years, playing by all the rules, and saving saving saving?
One of the first things I did after moving in here was painting the black and worse for wear mail box a bright shiny red. I had mentioned that to a friend in passing, and as part of my birthday present in 2014 was a can of bright red gloss spray paint! Free! The mailbox's fate was sealed. I love how it turned out. I always intended to paint the front door red too, and this year, finally, in fact today - I pulled the trigger and ordered the paint to get it done! I really want my red door, it's been silly to wait so long, so I will not wait another 4 years before I get around to actually opening the paint can and rolling on two coats of paint.
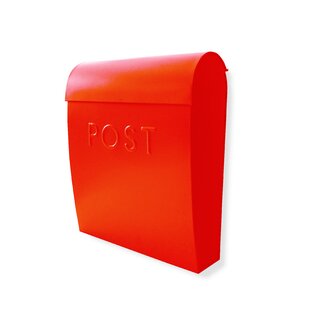
About six weeks ago, I repainted the current (old) mail box in gloss red again because rust spots were coming through, despite using Rustoleum. That mailbox has definitely seen better days. It may be nearly as old as the house (the house was built in 1956). I also wanted an actual factory-finished red mailbox, not buy a less expensive black one I'd have to spray paint every few years. So, last month, I shopped around and found one I liked online at Wayfair. It's much larger and an entirely different style from the current traditional mailbox and I think the new mailbox is a bit more "modern" looking. It arrived last week and it's gorgeous, but the mounting holes on the back don't fit the screws that are holding the current mailbox in place on the stone front of the house. I don't have a drill with an attachment to drill into masonry, let alone a power screw driver, so I will hire a handyman to do that - along with a few other things that I'll note below. Here's a pic of the new mailbox, by Nach, from Wayfair:
 I also decided to add a pair of budget-friendly vinyl shutters to the ginormous picture window with oversized white vinyl trim. I've thought about adding shutters to that window since Day 1 and, again, finally decided to pull the trigger. It took awhile to decide upon a style as I was shopping online. I quickly decided upon the paneled style as more suitable to the house, but then I came across some shutters that had three raised panels instead of two, and I loved the look. But then I looked at my front door, which has four less ornate raised panels, and decided to go for a simpler two panel raised design. This took a few days of looking looking and looking again and then stewing about it for a few nights to make up my mind. I finally settled upon black raised panel shutters (two panels of equal size) in a premium heavy vinyl guaranteed for 50 years (if I live that long I should win a prize). These are from Architectural Depot, which offers a huge selection of all kinds of styles and colors and free shipping:

I also ordered a new porch light, something I'd also been putting off, something a bit more modern looking (to my eyes, anyway) and a bit less traditional than the current coach lamp light, which I am not too fond of. I found this one at Target and liked it a lot, so I pulled the trigger right away to get a 15% Father's Day discount. It's 14.5"tall by Bel Air Lighting, and will make a statement above the cleaner lined mailbox with its equally clean lines and crackle glass:

I may also end up installing a kick plate to dress up the front door once it's painted, but it's not something I need to add right now.
This year things didn't work out with two different friends who said they would take me shopping for flowers but didn't. I don't drive, and the garden centers are too far away to either bus to in a reasonable amount of time or are not on bus routes at all. Plus, try lugging home two flats of flowers on the bus - I wouldn't attempt it! Thus, my front porch planters are EMPTY! It's really been bugging me. Here it is, nearly July, and my planters are vacant and forlorn looking, up their on the front porch with no beautiful plants in them for people to admire as they pass by the house. After thinking about what I could do to find some way to fill those planters, because I hate having them empty when people so enjoy the display every year, and then thinking about how much I've spend each year just on annuals alone, I decided on another splurge and ordered a pair of artificial 3-ball topiaries! I've always wanted to buy them but never wanted to spend the money. However, being carless (and even if I had access to a vehicle, I don't know how to drive, LOL!), beggars can't be choosers, so I found a good deal at QVC online for 3-foot tall topiaries that I fell in love with, and got a 5% discount plus a slight additional monetary discount by purchasing through Ebates. Every dollar saved helps. Here they are, so elegant!

They will be anchored firmly inside my white Chippendale style planter boxes so the black pots, which I know will tip over in the first breeze to come along if not inside the planter boxes, will be stable and hidden.
The handyman I hire will install the mailbox, the new light fixture, and the shutters. I'll paint the door. I'm also planning out some changes to the front yard garden beds that won't cost me anything but time and a lot of sweat, huffing and puffing in the heat and humidity and bug bites (they bite me even through Deep Woods Off, heavy jeans, sweatshirts and knee socks on). It involves transplanting some current perennials I already have elsewhere that need to be thinned out and/or divided - beauty at no cost and they'll fill in bare spots I'd been planting every year with annuals, not good for the pocketbook buying new every year. Trimming shrubs is also on the menu.
Project List:
1. Paint front door
2. Have new mailbox installed
3. Have new light fixture installed
4. Have new shutters installed
5. Install pair of topiaries on front porch
6. Trim miniature barberry bushes in front planting beds (they're not looking so miniature right now)
7. Divide and transplant some giant Iris to front planting beds
8. Remove and transplant giant volunteer columbine that appeared last year by magic and reseeded itself this year, right over a miniature Spirea
9. Divide and transplant some hostas from backyard to front garden beds (probably a fall project)
I'm going to be busy!
I would expand the garden beds, remove the tree that was planted too close to the bedroom corner of the house and have an appropriately sized tree (when mature) installed further away, and add tons of beautiful plantings. Or I might decide to go full-blown English cottage garden, complete with white picket fence and rose bushes everywhere, and a pillared front porch with a porch swing. I'd hire a professional landscape architect to do a fabulous design for me who would hire contractors to do all the work. I'd never have to lift a finger except to sniff and point if something doesn't please me. Or I'd buy a Cajun (French) style cottage and fix it up to look exactly like this one:
 |
| Source: Laurel Home blog. This is an "after" photo |
Ahhhh, I wish I had some of those trees. I'd also have a full-time gardener to take care of it all, LOL! To sleep perchance to dream...
Back to reality, THUD. On a limited retirement budget, dreaming of various gorgeous front (and back) yards is fun but can also be a bit depressing. That can paralyze you from doing anything because a few small changes here and there don't see like they'll make that much difference. And even those few extra things will stretch the budget and make you think twice about splurges that you really should not do because what if my Medicare increases by 50% or even disappears in 2020 if Speaker of the House Paul Ryan gets his way? I wouldn't be able to do a time reversal and unspend the money. One must be practical.
It's hard to believe, but next month will be four years from my 2014 move in date on July 7. Wow, time really is flying. I'm going to be 67 in a few months. I still have painting to do on the inside (yes, I know, me bad. Me very very bad.) And it makes me mad that I have to worry about spending maybe $500 in total to do some things to prettify my front yard which already looks respectable as it is. I want to be able to enjoy my house and be satisfied with how it looks on the outside and the inside in my old age. Is that too much to ask after working my butt off for 46 years, playing by all the rules, and saving saving saving?
One of the first things I did after moving in here was painting the black and worse for wear mail box a bright shiny red. I had mentioned that to a friend in passing, and as part of my birthday present in 2014 was a can of bright red gloss spray paint! Free! The mailbox's fate was sealed. I love how it turned out. I always intended to paint the front door red too, and this year, finally, in fact today - I pulled the trigger and ordered the paint to get it done! I really want my red door, it's been silly to wait so long, so I will not wait another 4 years before I get around to actually opening the paint can and rolling on two coats of paint.
About six weeks ago, I repainted the current (old) mail box in gloss red again because rust spots were coming through, despite using Rustoleum. That mailbox has definitely seen better days. It may be nearly as old as the house (the house was built in 1956). I also wanted an actual factory-finished red mailbox, not buy a less expensive black one I'd have to spray paint every few years. So, last month, I shopped around and found one I liked online at Wayfair. It's much larger and an entirely different style from the current traditional mailbox and I think the new mailbox is a bit more "modern" looking. It arrived last week and it's gorgeous, but the mounting holes on the back don't fit the screws that are holding the current mailbox in place on the stone front of the house. I don't have a drill with an attachment to drill into masonry, let alone a power screw driver, so I will hire a handyman to do that - along with a few other things that I'll note below. Here's a pic of the new mailbox, by Nach, from Wayfair:

I also ordered a new porch light, something I'd also been putting off, something a bit more modern looking (to my eyes, anyway) and a bit less traditional than the current coach lamp light, which I am not too fond of. I found this one at Target and liked it a lot, so I pulled the trigger right away to get a 15% Father's Day discount. It's 14.5"tall by Bel Air Lighting, and will make a statement above the cleaner lined mailbox with its equally clean lines and crackle glass:
I may also end up installing a kick plate to dress up the front door once it's painted, but it's not something I need to add right now.
This year things didn't work out with two different friends who said they would take me shopping for flowers but didn't. I don't drive, and the garden centers are too far away to either bus to in a reasonable amount of time or are not on bus routes at all. Plus, try lugging home two flats of flowers on the bus - I wouldn't attempt it! Thus, my front porch planters are EMPTY! It's really been bugging me. Here it is, nearly July, and my planters are vacant and forlorn looking, up their on the front porch with no beautiful plants in them for people to admire as they pass by the house. After thinking about what I could do to find some way to fill those planters, because I hate having them empty when people so enjoy the display every year, and then thinking about how much I've spend each year just on annuals alone, I decided on another splurge and ordered a pair of artificial 3-ball topiaries! I've always wanted to buy them but never wanted to spend the money. However, being carless (and even if I had access to a vehicle, I don't know how to drive, LOL!), beggars can't be choosers, so I found a good deal at QVC online for 3-foot tall topiaries that I fell in love with, and got a 5% discount plus a slight additional monetary discount by purchasing through Ebates. Every dollar saved helps. Here they are, so elegant!
They will be anchored firmly inside my white Chippendale style planter boxes so the black pots, which I know will tip over in the first breeze to come along if not inside the planter boxes, will be stable and hidden.
The handyman I hire will install the mailbox, the new light fixture, and the shutters. I'll paint the door. I'm also planning out some changes to the front yard garden beds that won't cost me anything but time and a lot of sweat, huffing and puffing in the heat and humidity and bug bites (they bite me even through Deep Woods Off, heavy jeans, sweatshirts and knee socks on). It involves transplanting some current perennials I already have elsewhere that need to be thinned out and/or divided - beauty at no cost and they'll fill in bare spots I'd been planting every year with annuals, not good for the pocketbook buying new every year. Trimming shrubs is also on the menu.
Project List:
1. Paint front door
2. Have new mailbox installed
3. Have new light fixture installed
4. Have new shutters installed
5. Install pair of topiaries on front porch
6. Trim miniature barberry bushes in front planting beds (they're not looking so miniature right now)
7. Divide and transplant some giant Iris to front planting beds
8. Remove and transplant giant volunteer columbine that appeared last year by magic and reseeded itself this year, right over a miniature Spirea
9. Divide and transplant some hostas from backyard to front garden beds (probably a fall project)
I'm going to be busy!
Catching Up: How I Arranged the Tray on the Round Ottoman
Hola! I've been so busy with spring clean-up (when spring finally arrived here, that is), and all of a sudden cutting grass every 5 days because we had tons of rain over a 2 week period and the grass grew I swear an inch a day! Anyway, the flower beds are slowly getting back to presentable, I've even managed to get some pruning done, and I've been busy planning some curb appeal improvements to the front of the house.
But first, I had promised way back in January (I think) to show you some photos of various ways I experimented with arrangements on the round framed glass mirror I finally decided to use as a "tray" on my ottoman.
I had shopped around online for tray but, of course, everything I really liked I wasn't willing to pay that much for. So I eyed up the contents of my house and lo and behold, one day while I was going through some accessories in the wreck room storage cabinets I came across a mirror I purchased years ago from The Bombay Company when they were the big thing and you were able to buy things online. It looked great in the room and I really liked that the mirror added a nice sparkle, so it stayed. Without further ado, here are some of my attempts, and then the final product:

Above, Try #1. I used a 14" diameter brass tray that I bought at a rummage sale years ago while on vacation in Las Vegas. It is solid brass and has Asian ladies engraved on the front with mountains in the background. I tried out a battery-operated candle, a black African-carved elephant with ivory and brass accents, and a set of black coasters. My initial reation was - meh.

Above, Try #2. I replaced the coaster set with a Damascus steel dish with its intricate design inlaid in gold thread. I bought in 2002 while visiting the ancient town of Toledo, in Spain. We visited a family that makes the Damascus steel in small furnaces and you can watch the artisans at wrk. That is actual 24 carat gold thread used to create the intricate geometric design. I had it in my glass hutch but it wasn't really noticeable there, and I want people to see it, I think it's so beautiful and it reminds me daily of that wonderful 10 days in Spain in October 2002. Not bad, but still blah. I knew I was going to keep using the Damascus steel dish though.

Above, Try #3. Third time's a charm, but I was also weary of trying to find something absolutely perfect. I swapped out the wood carved elephant and added three eggs from my egg collection, also housed in the hutch in the living room. The egg laying on its side (it has a carved flat side to lay that way) is made of white alabaster and I love it. I purchased it at a gift shop in Red Wing, Minnesota one summer's day when a friend and I drove across Wisconsin and across the Mississippi River to go visit a friend at the Mayo Clinic in Rochester, Minnesota. We took a break at the gift shop and that's where I bought the souvenir egg. That was my one and only trip to Minnesota. The larger clear egg is carved acrylic resting on a raised brass stand, and the smaller egg is hand-carved Waterford Crystal that I bought at a gallery in Las Vegas during one of my many past trips there. I liked this arrangement a lot, but still felt it was missing some zing.

And the winner is, ding ding ding ding ding: Try #4! Ta da! I swapped out the brass tray and used it elsewhere in the living room to hold the coasters from Try #1 through #3, replacing it with the Bombay Company mirror I mentioned above. Its diameter is the same as the brass tray but the actual flat area is smaller because the frame around it is deeper than the rim on the brass platter. The brass button moulding around the mirror and the mirror itself add sparkle and I love the look, a touch of glam in a room of elements mixing traditional and modern furnishings. It's been this way for 4 plus months now (whew, where does the time go?) and I haven't felt any urge to change it. That means it will probably stay that way for the next 10 years :)
Subscribe to:
Posts (Atom)