Happy Holidays!

December 17, 2022: Hi all. I'm still here, just been very busy (who of us is not?) I'm working on updating Maison Newton bit by bit, it's been awhile since I changed things up. Happy Holidays to all, soon the Winter Solstice will arrive and then the days will start to get longer once again, hooray!

Saturday, November 6, 2021

A Season Late - My Spring/Summer Look for the Living Room in 2021

 Hola and LOL!  Yep.  I've had the photos since May but just did not get around to posting anything much this spring/summer.  I spent a lot of time outdoors working in the front and back yards and on other activities.  My Maison Newton blog fell by the wayside.

So, back in April, I did a short post and showed you a preview of the colors, along with the new area rug, I was going to put in my living room.  At long last, here are the photos of what the room looked like during the spring and summer seasons:


Those paint touch-ups my handyman did on the wall back in 2014 (see above - to cover over patched nail holes) are driving me crazy.  On the "to do" list for 2022 - new paint for the living room, if I can ever decide on a color.  They show up so vividly in photos, not so much in real life when you're in the room.  Go figure!  As usual, I found some abstract prints on line that color-coordinate with the rest of the room, you can see two of those that I printed out in the photo above.


Unfortunately this photo turned out dark.  I'm not the best photographer, that's for sure!  The three pink colored throw pillow covers are new purchases this season, to coordinate with the new area rug; the two gold pillow covers were purchased shortly after I moved into this current edition of Maison Newton in July 2014.   


The bright colors really perked up the room, and me, this year.  The photos don't do those colors justice.  There is a rainbow of reds, pinks, oranges, golds, yellows, blues, grays, turquoise and white.  The pattern is not a mirror image on each side of the rug, and the colors do not necessarily match on each side.  It is a work of art for a machine woven rug.


I later added pink side panels on either end of the large picture window, but I wasn't satisfied with how they looked.  They ended up flanking either side of the patio door for the spring/summer season.  The dinette area and living room are open to each other.  In the first photo, you can see part of the large opening between the spaces and notice that teal curtains were still on the patio door (that was the color for winter 2020).  I changed out the pictures and decor in the kitchen/dinette area to coordinate with the colors in the living room for 2021, but I didn't take any photos.

Today, November 6, 2021, it may hit 60 around here today and may stay that warm through Monday, Holy Hathor!  By this time in 2019 we'd already had half a foot of snow and very cold temperatures - Halloween was greeted with strong winds, near freezing temperatures and torrential rain!  I'll take the 60 degrees F, thank you very much, Mother Nature!  

Monday, November 1, 2021

Easy Curb Appeal Added Over Seven Years

 Hola!  I moved into the current Maison Newton in July 2014 and retired in January 2015.  I've been puttering around the front and back yards since I first moved in and slowly making the home my own - hopefully for the better from when I bought it.  

This is a review of what I've done to the front of the house since I moved in to "dress her up" and make her pretty.  It's always so rewarding when I'm out working in the yard and a passerby stops and complements on how pretty my house looks. Other than maintenance yard work (mowing the grass, fertilizing, weeding, trimming shrubs, trees and grass and occasional edging the lawn), the steps I took to add to my home's curb appeal were pretty basic:

1.  Added annual and perennial plants to the garden beds, changed out plants that didn't do well.

2.  Added planters and door mat to front door area.

3.  Used a shepherd's hook to hang a bird house during spring and summer and a lantern with battery operated candle in fall and winter.

4.  Added nice trellis to the front of the house.

5.  Painted front door.

6.  Added shutters to the large picture window.

7.  New larger front porch light fixture.

8.  New larger address plaque.

9.  New larger mail box.

10.  Lined front garden beds with concrete blocks.

11.  Added new garden bed (area not shown in photo below) on south side of the driveway - it can be seen from the public sidewalk and added a lot of color and beauty to the yard, as well as replacing a lot of mud-encrusted gravel.

12.  Seasonal plantings here and there, to fill in bare spots and add some color, especially late in the season.

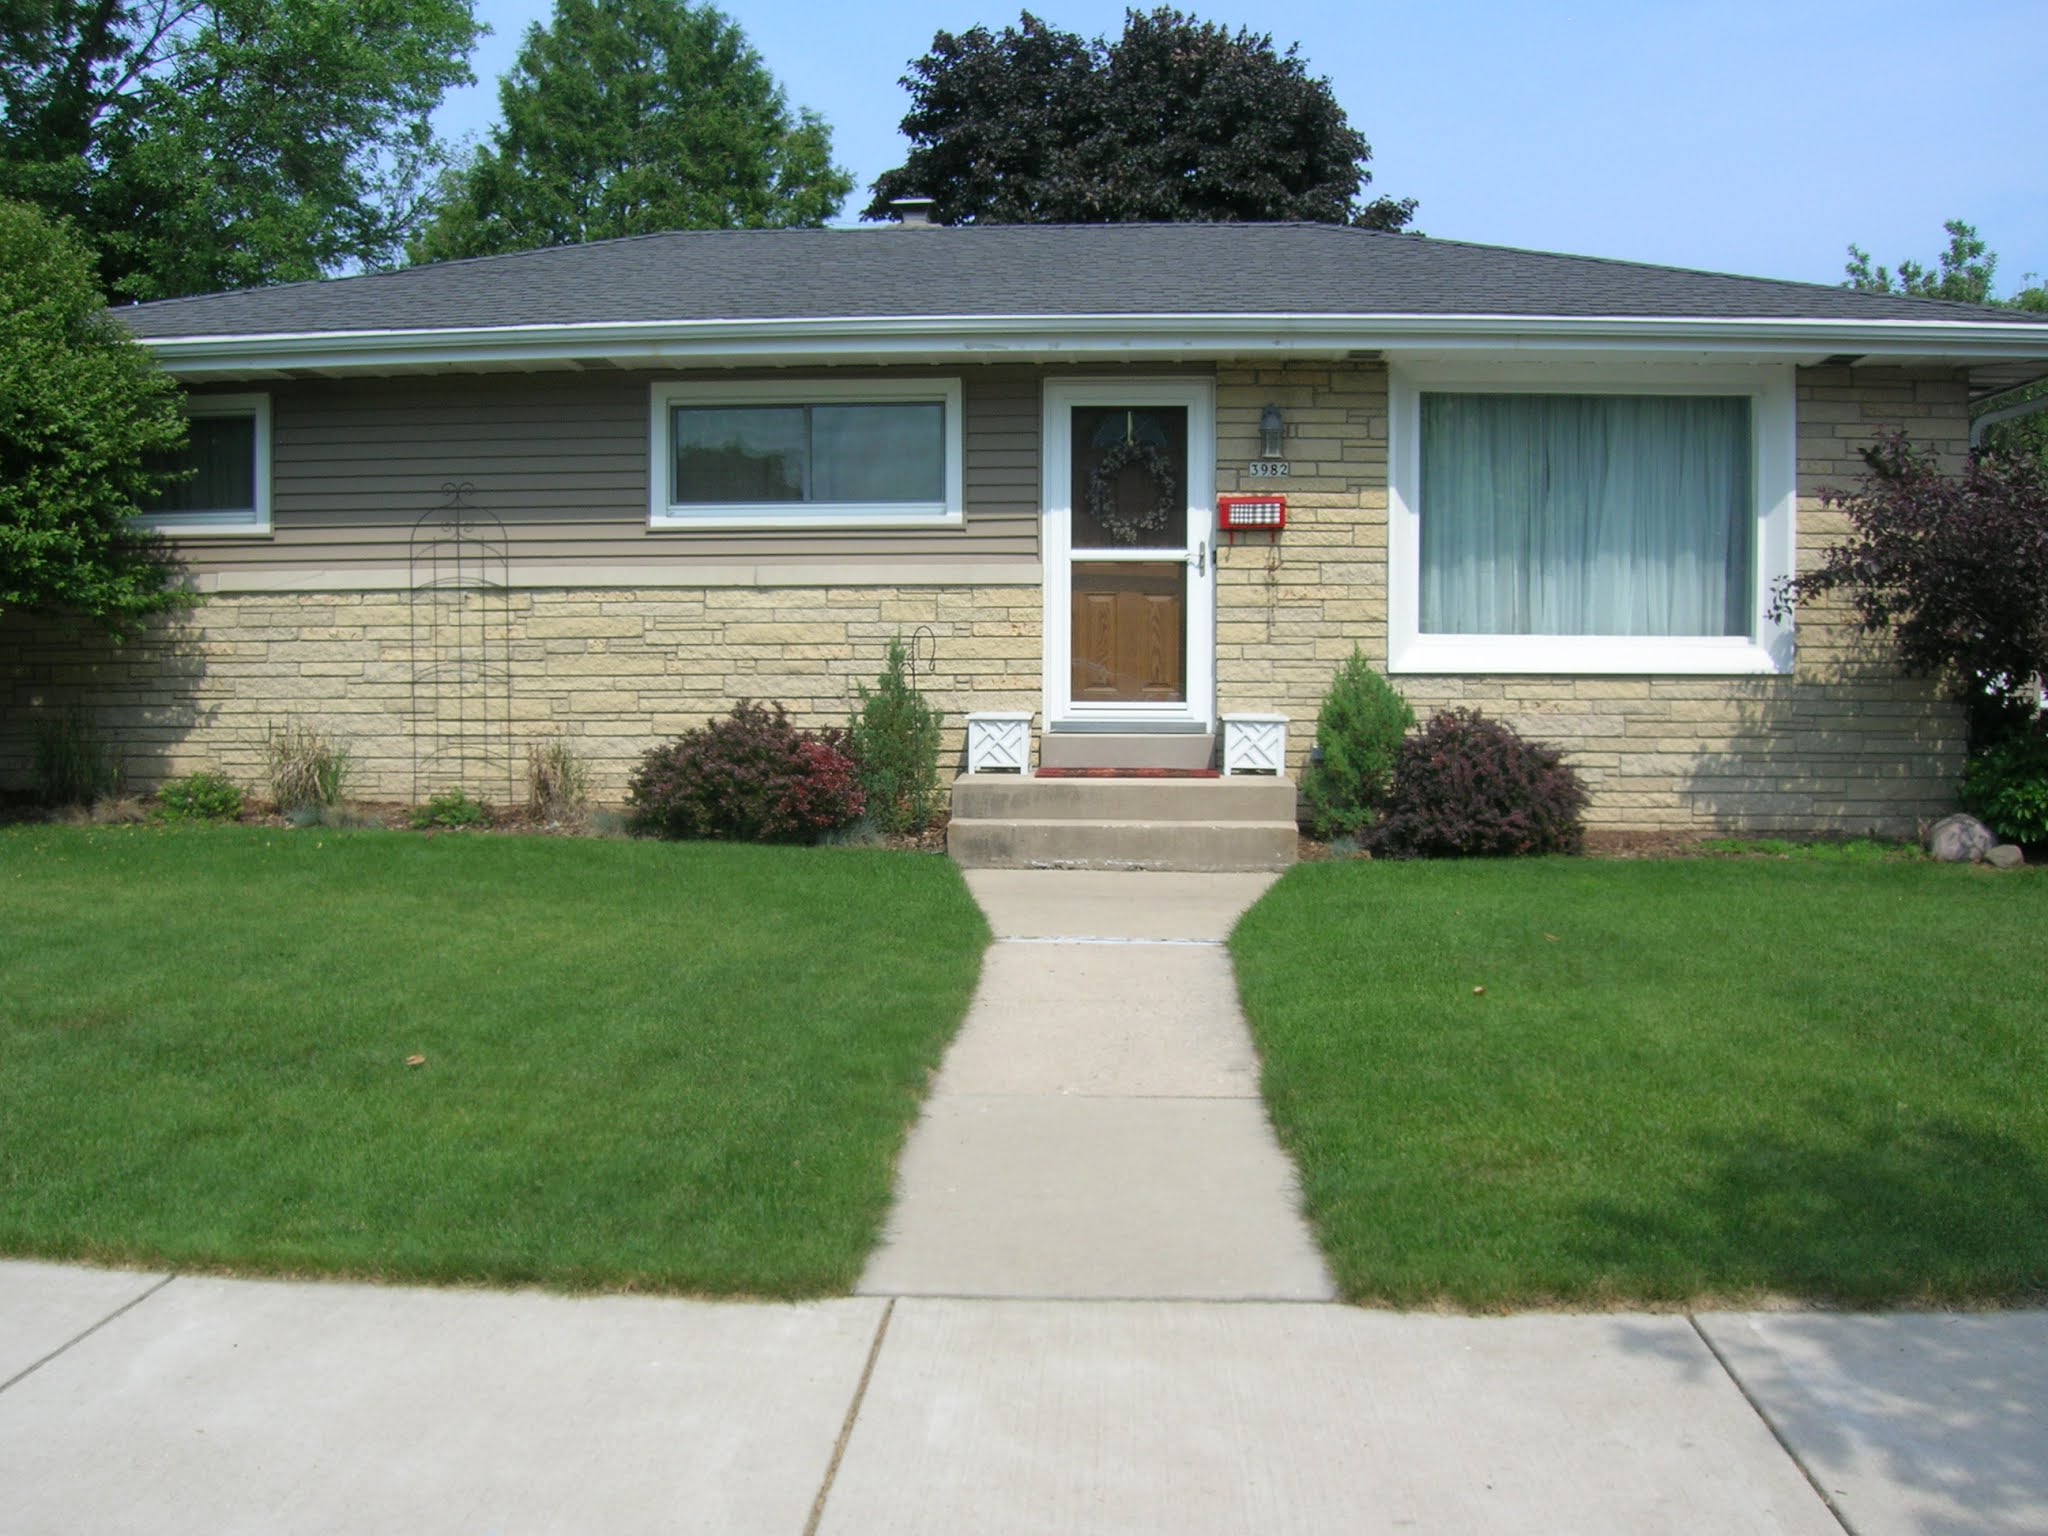
The house was well maintained but plain out front when I bought it, and the shrubs, trees and plants were much smaller than they are now.  Here's a photo of what the house looked like a few months before I bought it (early spring 2014; I bought the house at the end of May 2014):


One of the first things I did after I moved in was put up sheer curtains across the front window so people couldn't stare into the house 24/7/365!  I like my privacy.  

Within a few weeks I added a rug/mat to wipe shoes outside the front door and later added matching planters on either side of the door.  Below is a photo taken about 2 years after I moved in.  I had painted the original mail box red, added a swatch of wallpaper across the front of it to add some contrast to the red, and moved an old black metal trellis (that had been in the flower bed along the north side of my driveway) to between the windows on the left front side of the house.  I also hung a decorative wreath on the front door and change it out with the seasons.  What looks like a dark streak underneath the mailbox on the right side is a string of colored beads on a metal chain with a little bird on top.   The old mail box had two "hooks" hanging from underneath where a rolled newspaper could be inserted, and those hooks were great for holding decorations, especially at Christmas.


I don't recall the exact timing of improvements as I made them, but I had always wanted a red front door and finally, after living in the house five years, I got around to painting the fiberglass front door a bright cherry red, in the summer of 2019.  Yeah, it takes me awhile to get motivated sometimes.  Below is a photo I took during the painting process.


In 2019 I also added the following (via the wonderful work of a handyman):  (1) new light fixture; (2) new address plaque that is more visible and readable from the street (I covered up the old built-in address plaque with a piece of painted styrofoam, you can see it underneath the light.  It always bothered me that the house number wasn't centered under the light); (3) new larger red mailbox; and (4) the decorative shutters on the picture window.  

I had added the two artificial topiaries on either side of the door in 2017 (I think) and they lasted about three years before they started falling apart from sun damage.  Every time I touched one some of the artificial leaves would fall off.  I stored them inside in the basement during the winter, it was the sun that got to them even though they were treated to resist UV damage.  That front door and everything on the little front porch takes a real beating in the summer with sun from the southwest and full west.  I retired them at the end of the season in 2020.  In the photo below, taken in autumn 2019, you can see I added a second set of planters (temporary only) that were filled with hardy garden mums going into the fall.


With 2020 came the COVID-19 pandemic.  Despite the extreme heat and humidity, I got more active around the yard and the house than ever before.  Summer 2020 was when I finally lined the front garden beds and a garden bed in the backyard with small concrete retaining wall blocks I had bought from a niece-in-law a couple of years before.  They'd been sitting out behind the garage ever since then - a huge stack of them.  

Each block weighed 14 pounds and I lugged each one about 100 feet from behind the back of the garage in the backyard to the front yard, one by one. 


The white plastic trellis replaced the black metal one to anchor the space between the two windows on the left side of the house in 2016 or 2017.  It shows up much more against the colors of the house, but is stored in the garage during Wisconsin winters.  The photo above is what the house looked like in summer 2020.  You may notice the little bird house hanging from a shepherd's hook to the left of the front steps. In the autumn and winter that goes into storage and is replaced by a lantern with a battery operated timer candle.  

And below are some photos of what the front of the house looks like now, autumn 2021.  


The planters were filled with red geraniums and white petunias from May to the end of September, but as the weather got cooler the petunias started to look a bit straggly, so they have been replaced with some splashy-colored (orange, yellow, red) hardy daisy mums, and the planters have been supplemented with some artificial autumnal picks.  The hardy dais mums cost 10 and there were four individual plants in the one pot I bought at my local supermarket.  I call that a bargain!  My Halloween/Thanksgiving ceramic pumpkins and owls are outside in front of the planters, and the candle-lit lantern is on the right at the bottom of the steps:


On the left side of the front, this year (2021) I added two red drift hardy roses in late May along with some white dianthus.  On November 1, 2021, they're still blooming away!  The original tall grasses that were in the spots where the rose bushes now are just didn't do very well for me, they faded away more each year.  I finally took out what was left of them in 2019 and the garden bed was left pretty much bare other than for existing shrubs and a very large volunteer columbine that appeared a few years ago (that I removed this year and transplanted elsewhere).  The drift roses will survive the winter, but I am crossing my fingers about the white dianthus making it through to spring 2022.

On the right side of the house, I added some seasonal color with two of the hardy daisy mums.  My poor hostas took a real beating this year.  We had record-breaking heat, extremely high humidity, and a drought - all at the same time.  The two hostas that get the most sun were damaged with sun scorch, insect damage and perhaps some kind of infestation.  But from the sidewalk, the damage isn't as noticeable and the bright daisy mums add a spark to this smaller garden bed underneath the large picture window.  We haven't had a hard freeze yet, so I'm letting the leaves that are still on the hostas continue to take in the sun while they fortify their roots for the coming winter.  

For the cost of the changes over the years, I don't have an exact figure in my head but I'd say maybe between $700 and $800 over seven years, not including the cost of live plant.  The largest cost was for the burst of activity in 2019 when I ordered custom-made shutters for the front picture window, the new porch light, the new address plaque and hired a handyman to install them for me since I have no skills (or the correct tools and know-how) when it comes to doing work like that.  All in all - I consider the cost over the years a real bargain, and I love how my house looks on the outside.

But there are always more projects to do.  Am thinking of doing something with the front sidewalk, which has sunk quite a bit in front of the front porch.  Also am not a fan of the concrete front porch.  The flowering cherry on the left side of the house is too large to be that close to the house, even after having it trimmed back substantially in March.  I would like to replace it with a tree that won't overtake the house.  The garage needs rain decent rain gutters.  I would like to cut down on the lawn area in both the front and back yards but do I really want to add more garden beds to what I already have???

Decisions, decisions...

Sunday, April 18, 2021

Yard Work!

Hola!  It's been so busy here.  Whenever the weather has permitted since our wonderful warm streak of about 10 days where we sometimes hit 70F ended, I've been outside working the winter and pandemic blahs away.  Whew!  The result is a front yard that has fresh mulch and leaves cleaned out of everything and the lawn, which had exploded in growth, had it's first haircut on Friday 4/16.

I was so tired out after shoving my electric lawnmower for more than an hour I didn't have any ooomph left to attempt doing the trimming, let alone the edging I really want to do and that is really needs.  I did get the trimming done the next day, but the edging will have to wait.

After I got the grass trimmed all around the front yard on Saturday, I pulled the electric mower back out and plowed away at the backyard.  Whew!  I thought I had kept myself in pretty fair shape over the winter because I didn't gain any weight and exercised daily, but boy oh boy, I was aching after I finished mowing that back yard.  But it looks good - if I didn't look at the areas where the mower is too large to fit and a lot of trimming needed to be done.

Which brings me to today, Sunday - the day of rest, peace and quiet, right?  Except people who work (I'm retired so I don't worry about what day it is), who didn't get out on Friday like I did to cut their front lawns or backyards, and people who didn't get out and do it on Saturday, although I heard mowers going throughout the day, decided to get out and do it today before the temperature plunges back down again and we may get freezing rain/snow overnight tonight or possibly tomorrow.  I wonder how far the sound of a power lawn mower travels when there isn't a strong breeze?  More mowers were going this morning as I waited until a respectable 9 a.m. to go out and start trimming the backyard.  

What a chore!  But I got it done and cleaned up part of the refuse left behind afterward while I was waiting for a visit from a rep of a local company that specializes in tree and shrub trimming.

Here's my beautiful Japanese maple in summer 2020. 
As you can see, it's far too large for the space and already
this year the branches have gotten even taller, more full
and are rubbing against the rain gutters, the siding and the roof.

Yep - I decided - sob sob sob - to have my Japanese maple in the backyard garden area removed, as it was planted far too close to the house.  I can't really handle the pruning that it needs yearly to keep it in control by myself any longer, I have to face it, I'm not as young or strong as I used to be - and the six years I've been in this home I've noticed the difference as each birthday has passed.  This year I'll be 70 - in 4 scant months. I will replace the Japanese maple with a smaller specimen tree that I will plant out in the lawn area of my back yard, because I do love their gorgeous colors and form. It will be able to grow freely out there.

Here's a photo of the flowering cherry in July 2020.  You can see
how much it's encroaching on the house and nearly totally covering one
of my bedroom windows, as well as hitting the gutter and the roof.

The beautiful flowering cherry that the former owners planted far too close to the house for its ultimate size (and it's still growing) - I couldn't bear to take that down yet. What on earth could I ever replace it with?  Instead of the drastic measure of either removing the tree completely or pollarding it, we're going to limb up the tree quite a bit to raise the canopy, do a severe cut back along the house side so branches are no longer scraping against the house and on the roof, try and balance it as much as possible from street and side views, and do a lot of trimming/thinning out of branches on the inside of the tree to let more sunlight come through to the struggling lawn areas and plants growing underneath.  I'm prepared to do this for the next two to three years since to keep the tree healthy we shouldn't remove more than a third of it at a time.  Fingers crossed I don't have to make the sad decision to have the tree removed in a few years.

Summer 2020 - this is after vigorous spring pruning by me earlier
in the season.  It grew even more after this photo was taken.  You can see 
how it is rubbing against the rain gutters, the side of the house and is above
the roof.  It also hangs out over the driveway.  Just a matter of
time before it completely overtakes the space.

The purple - whatever it is - (I've called it a purple plum) that anchors the other side of the house next to the driveway, oh my.  It grows faster than I can keep up with.  The arborist suggested digging it out and trying to transplant it but there is a beautiful peony shrub (planted by the previous owner) coming up all around the base of that tree/shrub now and I just couldn't do it - plus I don't want it planted anywhere in the front or backyard - nowhere to go with it.  So, we settled on extensive trimming and we'll see how it goes over the next year.  I may have to have them come out every year from now on and continue to trim back those two trees (or one tree and one shrub-that has pretensions to turning into a tree).  

The two giant pines on the other side of the driveway will get a haircut so there are no branches hanging down too low over the driveway and some broken branches (from various windstorms) on the interior of the trees will be removed.  

I'm also having some trimming work done on the arborvitaes in the backyard so they are not encroaching over my neighbor's narrow walkway between my fence and the side of his garage, or scraping on his roof.  Heaven forbid, I don't want him out there on a ladder hacking away at my beautiful trees!  

Total cost:  $550.  Not inexpensive, but for the amount of work that needs to be done, a really good price.  Having it done by a trained crew also saves me a lot of work that emotionally I would find difficult to do (I'm such a wussy), that I don't have the proper equipment to do for myself (or the know-how), or the strength to be able to do for myself anyway.

I have to say, I was very impressed with the owner of the business, who came out on a Sunday to see me. I didn't expect that, but he called within less than hour after HomeAdvisors notified him on Saturday that I would like to receive a quote for the work that I wanted done.  He's young and has started up a fairly new company, but he knows his stuff.  After years of watching gardening shows and home improvement and landscaping shows, I've learned a lot, and I saw quickly that he knew what he was talking about.  

The work will be done sometime next week.  I'm not limited as to time, so it will really depend upon the weather, which may be turning nasty on us.

Meanwhile, I've been working off and on as weather and time has permitted to try and get the garden beds in the backyard cleaned out.  What a chore!  My first priority is to make sure the front and sides of the house that people view as they drive by or walk by are in pristine condition.  As I've been out working during the past 3 weeks or so, I've received so many complements from neighbors walking by the house.  Just amazing, and very gratifying, I have to say.

The poor backyard is always at the end of the list.  But it's getting there, pant pant pant...

Saturday, April 10, 2021

New Year, New Season, New Hope

 Hola everyone!  I hope you are all well and have made it through the Year from Hell No. 2 - 2020.  Shame on me for not having posted anything since December 2020, wow.  Time is passing much too quickly.

I've been busy doing spring cleaning inside - and outside, I've put in a lot of hours.  We had an incredible streak of far above normal warm weather for about 10 days and I worked outside daily for at least a couple of hours each day.  We had a lot of wind storms in March.  This year March did come in like a lion and go out like a lamb, and April has brought April showers.  No flowers yet other than a small patch of wild violets (sooooo pretty!) but boy oh boy, the rain we've received sure has greened up the lawn and with the warm weather, perennials are bursting through the earth much earlier than usual including through layer upon layer of still unraked molding leaves in the flower beds I haven't had a chance to clean out.  It's been raining for the past 3 plus days, off and on, and the garden beds are too wet and soggy to work in and the lawn is too wet and soggy to walk on, even though it already needs to be cut!   

I've been limited to running out whenever the rain halts for a few hours to sweep up the patio every few days and the driveway.  I am, however, hopeful that all the rain will wash away a lot of the gunk that was left behind by city crews in March who were a few houses down on the street fixing yet another burst water pipe.  Boy, we sure do need that Infrastructure Bill.  Milwaukee water pipes are over 100 years old, and showing their age.  Because of the pandemic our tax base has been decimated and we don't have the funds to do a wholesale repiping of the city, even though it needs repiping  - badly.  This is the second burst pipe in about 18 months, and the subsequent mess of inches of clay, small rocks and stones left behind in the gutters for we the homeowners to deal with.  Thus far I haven't touched the gunk, hoping first that melting feet high snow banks would wash most of the stuff away (nope); and then that the rains would wash most of the stuff away (nope).  Sigh.

Every year there seems to be more to do, but it could just be that I'm slower now than I was 6 years ago when I moved into this, my "retirement" home.  This year I'm facing 70 head on - and I DO NOT LIKE IT ONE BIT.

Sooooo - let me show you a few things:


Welcome to the new color palette for my living room decor for spring and summer 2021.  It's done already, I worked on it off and on last month, but I haven't taken photos of it yet.  I promise I'll post them.  It's the brightest and most "unlike me" decor I've ever introduced into any of my beloved Maisons Newton.  It makes my eyes pop every time I enter my living room, and I LOVE it!  I keep thinking this must have something to do with psychological damage I unknowingly sustained during the 13 plus months of pandemic hunkering down.  Ya think?  

Tuesday, December 15, 2020

2020 Christmas Tree

 I've finally gotten some photos downloaded.  For autumn/winter, I switched out the decor in the living room to include my favorite old teal lamp, and purchased some throw pillow covers and two 4' x 6' area rugs on sale in a beautiful traditional ("Oriental") print in rich colors of turquoise, teal, gold, different shades of darker blue and deep red accents here and there.


I got lazy and decided not to change to out again to go with my "traditional look" Christmas tree I've had for the past few years with primarily gold and red.  I kept the turquoise/teal, and ended up buying some inexpensive non-breakable teal and turquoise ornaments from Amazon to put on my tree along with gold, silver and crystal ornaments from my stash.  I added French ribbon in two different patterns/textures and pulled out my large gold poinsettia picks (13 years old), miscellaneous "hole stuffer" picks that are smaller, my gold-painted pinecones, and three different kinds of icicles.  Gold and silver butterflies that I bought on clearance several years ago from the Jonathan Adler collection complete the tree.


There's "me" (the Nefertiti pendant) and Mr. Don (the souvenir sword
and representation of the Keep from the ancient castle where his his
family's Scots clan originated).  On the tree every year, sentimental as I am.


And the cardinal tree anchors the countertop in the kitchen/dinette:


Tuesday, December 8, 2020

Make Your Own High End "Feather Filled" Ornaments

 Hola!  I've been meaning to post, but honestly just been super-busy as I'm sure you all have, too, particularly during this time of the year, pandemic or not.

I recently came across some ornaments at West Elm that I absolutely fell in love with, and since they were on special at 50% off, I decided to buy the pair, even though even at 50% off they were outrageously priced.  While I was window-shopping at West Elm, I came across these feather-filled clear glass ornaments.  They're very pretty, and ridiculously priced.  On my retirement budget I can't afford to buy such baubles, even on "sale," but even when I was working and making good money I wouldn't spend the 50% off price for these.  Not when they're so easy to make for yourself!

Here are the pretties from West Elm:

Above is West Elm's Feather Stuffed Ball Ornament, 3" (diameter) and 3.25" height (to account for the cap where the hook or a ribbon goes to put it on your tree - or whatever you are decorating).  The regular price is $9.00 for one, and a set of 2 is priced at $27.00 Holy Hathor!  Sales price is $5.40 for one, and set of 2 is sale-priced at $18.90.  I still can't figure out why you wouldn't be better off just buying two at $5.40 each, or even 3 on sale, which would still be less than $18.90.  Hmmmm - am I missing something?

Anyway, I thought to myself, "Self,  this is an easy hack."  I'm not a particularly crafty or handy person, but even I can manage this hack!

I found both of these items online and didn't look further than them since I thought the prices were already really good:

From Michaels a fair-sized bag of white feather bits for $3.29 that could be easily stuffed into several clear Christmas ornaments to create the high end look from West Elm:


Michaels also offers clear plastic Christmas ornaments of 2.6" diameter and 3" height (25 count on sale now for $9.99, regularly $19.99), and a slightly larger size 3" diameter and 3.5" height (25 count on sale also for $9.99, regularly $19.99):


Yes, they're not glass.  But if you're a Miss Klutz like I am plastic ornaments are the way to go.  And if you have kiddies with curious hands, dogs with big whopping tails or cats who can't seem to resist batting at ornaments...

Not a difficult task to spend a little time taking the silver clip off the top of the ornament, stuffing feather bits into the opening to a fullness that appeals to you, and re-inserting the silver clip at the top of the ornament when you're finished.  Voila!  

It occurred to me just before publishing this that probably dozens of others if not hundreds and maybe even thousands of bloggers have come up with the same hack, but here it is, for what it's worth.  I think they're cute.  They may make appearance on my Christmas tree in 2021...

Sunday, November 1, 2020

Easy Chicken Casserole

 Hola!  I hope everybody is keeping well and safe.

Cold and extremely windy weather has arrived in my part of Wisconsin, brrrrrrr!  It's the time when the thick throws come out and are draped everywhere and flannel sheets go on the bed with a quilt and extra faux Sherpa throw - just in case.  And my gel fuel fireplace is getting used.

This experiment in my limited cookery skills came about a few days ago after I had pulled out an aluminum wrapped mystery package from the freezer, thinking it was about a pound of ground beef.  My original intention was to make my easy version of a Shepherd's Pie. But after it thawed out and I peeked, it turned out to be a very large boneless/skinless chicken breast.  I mean - BIG, like the size of two chicken breasts you would get at a restaurant when people were still eating at them.

So there I was - with this chicken breast that I wasn't prepared to use.  I could have made some kind of chicken and rice dish but - nah - just not my style.  So I rummaged around, discovered at the back of one of my cabinets a can of Campbell's Golden Mushroom Soup.  That came out to the counter.  I had a half of green pepper in the veggie drawer in the fridge, that came out.  I had frozen veggies in the freezer.  Out came two bags - one corn, one peas.  I dumped about half of each into a bowl to thaw out a bit and the half-filled bags (after I sealed them) went back into the freezer.  I could have topped the dish with instant mashed potatoes (surprisingly good if made with just the right amount of butter, milk and salt) but I have a lot of boxes of Idahoan instant potatoes in one of my cabinets - I picked up several when they were on special, they last for months, don't take up space in the freezer or fridge, and are quite delicious.  I pulled out a box of Scalloped Potatoes.

Okay, I thought, I'll make a version of a sort of chicken Shepherd's Pie but with the scalloped potatoes on top rather than mashed potatoes.  Well - turned out to be absolutely delicious, so I have another easy peasy recipe to add to my repertroire! 

I want to be clear that I will never audition for "Master Chef," LOL!  I am a SLOW cook.  It takes me forever to do the prep, even easy peasy prep.  But here's the recipe for all cooks who want to try something new and quick for some of you:

Ingredients

  • 8 to 10 oz. boneless/skinless chicken breast, cubed in 1/2" to 1" size
  • 1 can Campbell's Golden Mushroom Soup (do not use regular generic Cream of Mushroom Soup, you won't get the flavor and rich deep color of Golden Mushroom Soup)
  • Vegetables - use approximately 8 to 10 oz. of frozen mixed vegetables to your taste (I used some frozen peas, some frozen yellow corn, and chopped up half of a left-over green pepper)
  • 1 box Idahoan Scalloped Potatoes (prepare per directions and set aside)
  • Salt to taste (I don't use a lot of salt, it was about 1/4 teaspoon.  As you will be topping with a commercially made product - the potatoes - and mixing in the canned soup - there will be a lot of sodium already added to your dish).
  • Optional:  1/4 cup to 1/3 cup total of sweet pink or white wine
  • Optional:   2 tablespoons dried chopped onions or 1/8th cup chopped fresh sweet onion

 Directions

  • Begin browning chicken in about 2 tablespoons oil.  I use extra virgin olive oil.
  • Optional:  Add chopped onion to pan with raw chicken and oil.  If you use dried chopped onion like I often do, add some extra oil to the pan.
  • Optional:  Add wine after slight browning of chicken (with or without onion) occurs.  Simmer 5 minutes.
  • Add drained vegetables to chicken along with chopped green pepper.  Bring back to a simmer.
  • Add Golden Mushroom Soup to the simmering chicken, vegetables, wine and olive oil.
  • Optional:  Use about 1/8th cup additional wine to "rinse" out soup can and add to pan.
  • Simmer chicken/veggy/wine mixture about 10 minutes after the last ingredient (or optional wine) is added.
  • Remove from heat and pour contents of pan into a round casserole dish (size about 4" tall and about 9" diameter) or other casserole dish contents will fit in when topped with potatoes.
  • Top with the prepared scalloped potatoes.
  • Bake uncovered in preheated 350 degree (F) oven for 30-40 minutes.  You want to see the potatoes slightly browned and bubbling around the sides of the casserole dish.
  • Remove and cool about 10 minutes covered to eating temperature.

This casserole gave me five delicious and hearty meals (two are going in the freezer in individual servings).  It's really tasty!  The best thing is that this recipe can be made with ground beef or cubed beef stew meat and topped with any style of potatoes you/your family likes best.

Grandma, if you're looking on or watching over me from somewhere, I hope you'll be proud that at 69 years of age I'm getting brave enough to experiment a wee bit more and "go for it" cooking-wise in the kitchen.